Next.js server actions with FastAPI backend and OpenAPI client
Connect Next.js to a FastAPI backend while preserving a modern React workflow with server actions and server components.
· tutorials · 22 minutes ·
Introduction
In 2026, Next.js and server components are the industry standard for building server-side rendered React websites. Next.js comes with API routes by default for building backend endpoints, but for various reasons you may want to use a completely different programming language and a non-TypeScript backend. For example, FastAPI is known for its excellent integration with ML and AI libraries, which are typically implemented in Python.
Today we will show how to implement one critical part of every full-stack app: data fetching and data mutations using Next.js and FastAPI. There is more than one way to do this, but we will aim to choose and implement the best one.
We will not start completely from scratch, but instead reuse https://github.com/fastapi/full-stack-fastapi-template as a starting point. It already provides a solid foundation, especially on the backend, where we will only change session storage from localStorage to an HttpOnly cookie. In contrast, we will replace most of the frontend code by switching from TanStack Router, React Query, and Chakra to Next.js 16, ShadcnUI, and Tailwind CSS v4.
The problem statement and requirements
What is the real challenge here? Modern React 19 and Next.js 16 provide new, advanced features and a standardized workflow not only for fetching data into components but also for managing state. These span both the server and the client, and we should aim to fully leverage them.
So the real goal is this: we want to use a non-TypeScript backend while at the same time preserving the well-established server components model for data fetching and the server actions model for data mutations, with the same level of type safety and state management we would have when using Next.js API endpoints.
Architecture overview
Visual representation of the architecture we will build in this tutorial.
Deployment diagram:
Sequential diagram:
Modify the backend to use HttpOnly cookie auth
Server-side rendering and server components are central features of modern Next.js and React. The original starter stores the session in the browser’s localStorage, which prevents us from having server-side rendered private pages and components. We will modify this to store the session in an HttpOnly cookie instead, which we can access and read in server components.
In the original repository, there is already a pull request, Replace plaintext auth tokens with HttpOnly cookies #1606, that implements this. We will reuse it and adapt it to our needs. Let’s highlight the most important parts of this code and discuss them.
First, let’s create utilities to set and unset the auth cookie in API responses. Note the signature of the set_auth_cookie method: set_auth_cookie(subject, expires_delta, response). We pass in the subject (typically a user.id) and the token’s expiration, as well as a response argument of the base class type Response so that this utility can be applied to any specific response subclass. The create_access_token() method itself remains unchanged; the token is created the same way for both localStorage and cookies.
def set_auth_cookie(    subject: str | Any, expires_delta: timedelta, response: Response) -> Response:    # Cookie expiration and JWT expiration match    # Note: cookie expiration must be in seconds    expires_in_seconds = int(expires_delta.total_seconds())    access_token = create_access_token(subject, expires_delta)
    # Dev defaults    samesite = "lax"    domain = None
    # Prod overrides    if is_prod:        samesite = "none"        # Note: important for cross-site cookies in prod to succeed        # api-site.rpi.example.com and site.rpi.example.com        parsed = urlparse(settings.SITE_URL)        domain = parsed.hostname  # full domain
        # if it has subdomains whitelist cookie for "1 level less" subdomain, rpi.example.com        host_segments = domain.split(".")        if len(host_segments) > 2:            domain = ".".join(host_segments[1:])  # remove the first segment (head)
    logger.info(f"domain: {domain}")
    response.set_cookie(        key=settings.AUTH_COOKIE,        value=access_token,        httponly=True,        max_age=expires_in_seconds,        expires=expires_in_seconds,        samesite=samesite,        secure=is_prod,        domain=domain,    )    return response
The core idea is straightforward: create a token, assign it to the cookie value, and attach the cookie to the response object.
There is some added cross-site cookie complexity specific to my use case, which you may not necessarily need to replicate, but let’s explain it for the sake of clarity.
Cross site cookie configuration
In general, in practice, the frontend and backend often don’t share the same domain, and you need to account for this because cookies are tied to a domain. For example, if the frontend is on my-website.com and the backend is on api.my-website.com, the backend must set domain = "my-website.com" and samesite = "none" for the browser to accept and store the cookie.
On my server, I use an additional Traefik TCP router that treats a dot . as a special delimiter character, which prevents it from correctly routing infinite-depth subdomains. As a result, I had to use a dash - instead for my backend domain.
# frontend urlhttps://full-stack-fastapi-template-nextjs.arm1.nemanjamitic.com
# backend urlhttps://api-full-stack-fastapi-template-nextjs.arm1.nemanjamitic.com
The additional cookie domain logic essentially does the following: if the frontend is on a subdomain, it sets the cookie for the parent domain (one level up). For example, in this specific case, arm1.nemanjamitic.com.
That’s enough for this digression, I just wanted to emphasize that you must carefully adjust the domain property of a cross-site cookie depending on the URLs where you host your frontend and backend. Otherwise, the browser will reject the cookie, and authentication will fail.
Similarly, we use this code to unset the auth cookie. We simply return a JSONResponse containing an expired cookie with the same key. It can be improved, but it will suffice for now.
def delete_auth_cookie() -> JSONResponse: response = JSONResponse(content={"message": "Logout successful"}) response.delete_cookie( key=settings.AUTH_COOKIE, path="/", domain=None, httponly=True, samesite="lax", secure=is_prod, ) return responseLogin / logout endpoints
Now it’s time to make use of these utilities to log in and log out a user.
For login, we first verify that the user has provided a valid email and password. If the credentials are correct, we use the user.id to generate an access token, set it as the cookie value, and include the cookie in the response using the previously mentioned security.set_auth_cookie() utility.
backend/app/api/routes/login.py
@router.post("/login/access-token")def login_access_token(    session: SessionDep, form_data: Annotated[OAuth2PasswordRequestForm, Depends()]) -> JSONResponse:    """    OAuth2-compatible token login: get an access token for future requests (sent in an HTTP-only cookie)    """    user = crud.authenticate(        session=session, email=form_data.username, password=form_data.password    )    if not user:        raise HTTPException(status_code=400, detail="Incorrect email or password")    elif not user.is_active:        raise HTTPException(status_code=400, detail="Inactive user")
    access_token_expires = timedelta(hours=settings.ACCESS_TOKEN_EXPIRE_HOURS)    response = JSONResponse(content={"message": "Login successful"})
    return security.set_auth_cookie(user.id, access_token_expires, response)
For logout, we simply use the security.delete_auth_cookie() utility to unset the cookie from the user’s browser.
Note: we are implementing this endpoint for the sake of completeness in the FastAPI backend. In our particular setup, however, we will use the Next.js server to clear the auth cookie.
backend/app/api/routes/login.py
@router.post("/logout", dependencies=[Depends(get_current_user)])def logout() -> JSONResponse: """ Delete the HTTP-only cookie during logout """ return security.delete_auth_cookie()Protect endpoints with auth
After implementing login and logout, we can use them to protect specific API endpoints by identifying the user from the request and checking whether they have sufficient privileges to access a resource or perform an action.
We will use FastAPI’s dependency injection to centralize the logic for obtaining the auth cookie with CookieDep and for identifying the user who sent the cookie with CurrentUser. The get_current_user() method checks for the existence of the cookie, decodes and verifies the validity of the access token from the cookie, and finally uses the user.id from the token’s subject to query the user from the database.
cookie_scheme = APIKeyCookie(name=settings.AUTH_COOKIE)
CookieDep = Annotated[str, Depends(cookie_scheme)]

def get_current_user(session: SessionDep, cookie: CookieDep) -> User:    if not cookie:        raise HTTPException(            status_code=status.HTTP_401_UNAUTHORIZED,            detail="Not authenticated",        )
    try:        payload = jwt.decode(            cookie, settings.JWT_SECRET_KEY, algorithms=[security.ALGORITHM]        )        token_data = TokenPayload(**payload)    except (InvalidTokenError, ValidationError):        raise HTTPException(            status_code=status.HTTP_403_FORBIDDEN,            detail="Could not validate credentials",        )
    user = session.get(User, token_data.sub)    if not user:        raise HTTPException(status_code=404, detail="User not found")    if not user.is_active:        raise HTTPException(status_code=400, detail="Inactive user")
    return user
CurrentUser = Annotated[User, Depends(get_current_user)]
Now, any function or route in FastAPI can make use of the CurrentUser dependency to identify the user simply by including it as a typed argument. Below is a simple /me endpoint for illustration.
backend/app/api/routes/users.py
@router.get("/me", response_model=UserPublic)def read_user_me(current_user: CurrentUser) -> Any: """ Get current user. """ return current_userWith this HttpOnly cookie setup, authentication on the backend is complete. Essentially, we didn’t change much, we only moved the access token from the JSON body of the response to the cookie header.
Generate and configure OpenAPI client
Now that we have moved the session from localStorage to an HttpOnly cookie, we can identify the user in server components on the Next.js server. An important and obvious note worth repeating: HttpOnly cookies are accessible only on the Next.js server, not in the client-side JavaScript running in the browser.
Since our setup involves Next.js client -> Next.js server -> FastAPI server, we need to handle cookie transmission accordingly. We will continue using the @hey-api/openapi-ts package from the original template, but for our Next.js app, we will use the @hey-api/client-next client and configure it to handle the auth cookie properly.
Here is the configuration for generating the OpenAPI client:
frontend/apps/web/openapi-ts.config.ts
const config: HeyApiConfig = defineConfig({ input: './openapi.json', output: { format: 'prettier', lint: 'eslint', path: './src/client', importFileExtension: null, }, exportSchemas: true, // backend models types plugins: [ // Note: order matters { name: '@hey-api/typescript', enums: 'javascript', // const objects instead of enums }, '@hey-api/schemas', // default json, req.body, '{"username":"abc","password":"123"}' { name: '@hey-api/sdk', asClass: true, // UsersService.readUserMe(), 'true' doesn't allow tree-shaking classNameBuilder: '{{name}}Service', // class Users -> UsersService // @ts-expect-error @hey-api/openapi-ts doesn't export types methodNameBuilder, // usersReadUserMe -> readUserMe }, { name: '@hey-api/client-next', // relative from src/client/ folder runtimeConfigPath: '../lib/hey-api', // sets API_URL, auth... }, ],});The important parts are: we choose the Next.js client @hey-api/client-next, control the SDK method names using the methodNameBuilder callback, and specify the path for the generated client runtime configuration with runtimeConfigPath.
Runtime client configuration
There are several ways to set runtime configuration for the generated client. We will use the runtimeConfigPath field to specify the path to the configuration file, as this is the recommended approach according to the docs: https://heyapi.dev/openapi-ts/clients/next-js#runtime-api.
The auth cookie is originally stored in the browser and is included in client requests by default. An important note is that the cookie in these requests is valid only for the frontend domain (Next.js server) and not for the backend domain. If you try calling the FastAPI backend using this cookie, you will get a 403 Forbidden HTTP error. That’s why requests from client code need to be proxied through a Next.js API endpoint to the FastAPI backend.
In contrast, HTTP requests made from the Next.js server do not include the cookie automatically at all, so we need to forward it explicitly.
We handle both of these requirements in a base runtime configuration at the SDK instance level in a single place, so we don’t have to repeat this logic for every specific call.
Here is the code:
frontend/apps/web/src/lib/hey-api.ts
const { CLIENT_PROXY } = ROUTES.API;
/** Runtime config. Runs and imported both on server and in browser. */export const createClientConfig: CreateClientConfig = (config) => {  const { API_URL } = getPublicEnv();
  return {    ...config,    baseUrl: API_URL,    credentials: 'include',    fetch: isServer() ? serverFetch : clientFetch,  };};
const serverFetch: typeof fetch = async (input, init = {}) => {  // Note: Dynamic import to avoid bundling 'next/headers' on client  const { cookies } = await import('next/headers');
  const cookieStore = await cookies();  const cookieHeader = cookieStore    .getAll()    .map((c) => `${c.name}=${c.value}`)    .join('; ');
  // Note: must append auth_cookie like this or content-type header will break in server actions  const headers = new Headers(init.headers);  headers.append('Cookie', cookieHeader);
  // test skeletons styling  // await waitMs(3000);
  const response = fetch(input, { ...init, headers });
  return response;};
/** Client-side fetch: forwards requests to api/client-proxy/[...path]/route.ts */const clientFetch: typeof fetch = async (input, init = {}) => {  const { API_URL } = getPublicEnv() as { API_URL: string };
  // hey-api sends absolute URL  const url: string = typeof input === 'string' ? input : input.toString();
  // Normalize to relative URL  // API_URL.length + 1 - removes leading slash, API_URL guaranteed not to have trailing slash  const relativeUrl = url.startsWith(API_URL) ? url.slice(API_URL.length + 1) : url;
  // Build the proxy URL relative to Next.js API  const proxyUrl = `${CLIENT_PROXY}${relativeUrl}`;
  const headers = new Headers(init.headers);
  return fetch(proxyUrl, { ...init, headers, credentials: 'include' });};
Server fetch override
The important part here is the serverFetch override for the fetch function used by the generated client on the Next.js server. The serverFetch code typically runs either on a server-side rendered page or in a server action. Both of these have access to the request object (including headers and cookies) that originally comes from the browser.
Based on this, we read the cookies (including the auth cookie) and forward them to the fetch client, which makes requests from the Next.js server to the FastAPI endpoints. This creates the following chain: browser -> Next.js server -> FastAPI server.
There are a few additional tricks required to make this work correctly.
- We use a dynamic import,
const { cookies } = await import('next/headers'), to prevent bundling server-only code into the client bundle, which would break the build. - We must create a
new Headers()instance and use theappend()method to pass cookies tofetch. - We obtain the
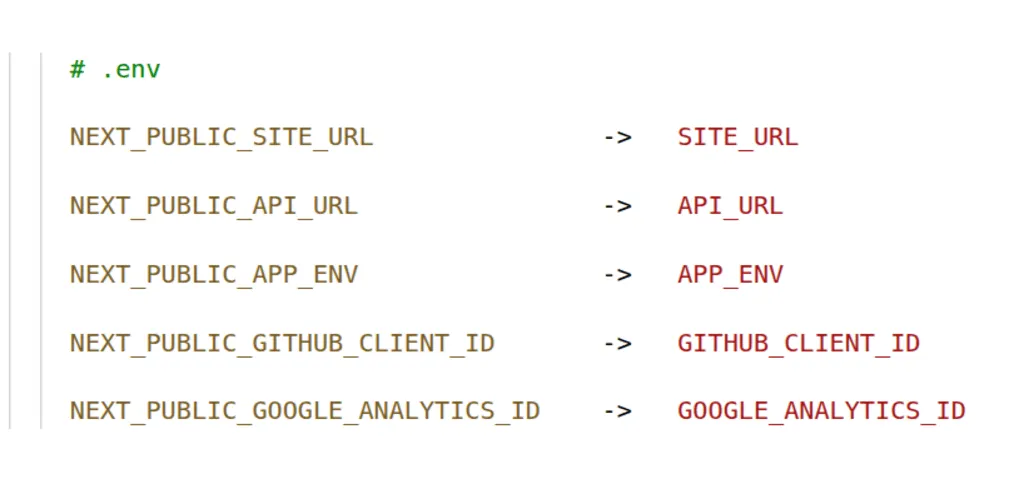
API_URLenvironment variable usingconst { API_URL } = getPublicEnv()from thenext-public-envpackage. For a reusable build,API_URLmust be a runtime variable. Since this code runs both on the server and in the client, it must get the correct value in both environments. I wrote about reusable Next.js builds and runtime environment variables in detail in this article: Runtime environment variables in Next.js - build reusable Docker images.
Example client calls from Next.js server code
With this OpenAPI client, we can make HTTP authenticated calls from Next.js pages, server components, and server actions to protected FastAPI endpoints.
Example 1. Query in a page:
frontend/apps/web/src/app/dashboard/items/[[…page]]/page.tsx
const ItemsPage: FC<Props> = async ({ params }) => {  const { page } = await params;  const { currentPage, isValidPage } = parsePage(page);
  if (!isValidPage) notFound();
  const result = await ItemsService.readItems({    query: {      skip: (currentPage - 1) * PAGE_SIZE_TABLE,      limit: PAGE_SIZE_TABLE,    },  });
  const items = result.data;
  // ...
}
Example 2. Query in a server component:
frontend/apps/web/src/components/dashboard/home/list-recent-items.tsx
const ListRecentItems: FC = async () => {  const result = await ItemsService.readItems();
  throwIfApiError(result);
  const items = result.data?.data ?? [];
  // ...
}
Example 3. Mutation in a server action:
frontend/apps/web/src/actions/item.ts
export const itemCreateAction = async (  _prevState: ApiResult,  formData: FormData): Promise<ApiResult> => {  const body = Object.fromEntries(formData) as ItemCreate;
  const apiResponse = await ItemsService.createItem({ body });
  const { response: _, ...result } = apiResponse;
  revalidatePath(ITEMS);
  return result;};
Client fetch override
The clientFetch implementation rewrites the original URL pointing to FastAPI to a Next.js API endpoint that serves as a proxy. With this, every call from the client code is routed to the Next.js API proxy endpoint.
The Next.js API endpoint then parses the authorization cookie and attaches it to the actual request to the corresponding FastAPI endpoint. It does the same for the response by forwarding the cookie from the FastAPI response back to the Next.js client code. In practice, it acts as a proxy middleman that attaches the cookie in both directions.
As a result, HTTP requests from the client code can be authenticated correctly with FastAPI instead of being rejected with a 403 Forbidden error.
Note: This call is not displayed in the architecture diagram, it needs to be updated.
frontend/apps/web/src/app/api/client-proxy/[…path]/route.ts
const proxyHandler = async (request: NextRequest, { params }: ClientProxyRouteParam) => {  const { path } = await params;
  const { API_URL } = getPublicEnv();
  // params.path just splits into array, this just joins back to string  // path = ['api', 'v1', 'users', 'me'] -> http://api.localhost:8000/api/v1/users/me  const backendUrl = `${API_URL}/${path.join('/')}`;
  // clone headers from client request  const headers: Record<string, string> = {};  request.headers.forEach((value, key) => (headers[key] = value));
  const { method } = request;  const body = ['GET', 'HEAD'].includes(method) ? undefined : await request.arrayBuffer();
  const apiResponse = await fetch(backendUrl, { method, headers, body });
  const data = await apiResponse.arrayBuffer();  const response = new NextResponse(Buffer.from(data), { status: apiResponse.status });
  // copy headers from backend response, excluding ones automatically controlled by Node/Next.js internally  const excludeHeaders = ['content-encoding', 'transfer-encoding', 'connection'];  apiResponse.headers.forEach(    (value, key) => !excludeHeaders.includes(key) && response.headers.set(key, value)  );
  // optional: return error if response not ok  if (!apiResponse.ok) {    console.warn('Client proxy returned error:', apiResponse.status, backendUrl);  }
  return response;};
// add PUT, DELETE, PATCH if needed
export const GET = proxyHandler;
export const POST = proxyHandler;
Example client calls from Next.js client code
Example 1. Query in a page’s client component:
frontend/apps/web/src/app/page.tsx
'use client';
// ...
const { LOGIN, DASHBOARD } = ROUTES;const { HOME_PAGE_REDIRECT } = DELAY;
// Must be client component to show loader before redirect
const HomePage: FC = () => {  const router = useRouter();
  useEffect(() => {    const redirect = async () => {      // client side call, cookie valid only for Next.js API domain, and not for FastAPI domain      const result = await UsersService.readUserMe();      const currentUser = result.data;
      await waitMs(HOME_PAGE_REDIRECT);
      const redirectUrl = currentUser ? DASHBOARD : LOGIN;      router.push(redirectUrl);    };
    redirect();  }, [router]);
  return (    <div className="flex items-center justify-center min-h-screen">      <div className="text-center">        <div className="animate-spin rounded-full h-8 w-8 border-b-2 border-gray-900 mx-auto"></div>        <p className="mt-2 text-gray-600">Redirecting...</p>      </div>    </div>  );};
Mutations
The original idea of this article is to preserve the default React workflow, even when using a non-TypeScript backend. To achieve this, the client code must not be aware of the FastAPI endpoints and should never call them directly, but only through the Next.js server, which will forward the requests.
We have already implemented passing the cookie from the browser to FastAPI via the Next.js server, but we have not yet implemented the opposite direction. The FastAPI login endpoint sets the cookie in the response; now we need to forward it through the Next.js server to the user’s browser. Here is the code that accomplishes this:
frontend/apps/web/src/utils/actions.ts
export const forwardCookiesFromResponse = async (response: Response): Promise<void> => {  const rawCookies = response.headers.get('set-cookie');  if (!rawCookies) return;
  const parsed = setCookieParser.parse(rawCookies);  const cookieStore = await cookies();
  for (const c of parsed) {    cookieStore.set({      name: c.name,      value: c.value,      httpOnly: c.httpOnly,      secure: c.secure,      path: c.path ?? '/',      sameSite: c.sameSite as any,      expires: c.expires,    });  }};
The utility method above retrieves the cookies from the FastAPI response object, parses them using the set-cookie-parser package, and finally attaches the parsed cookies to the Next.js response that will be returned as part of the server action.
We then call this utility method within the login server action, which sets the forwarded cookies in the user’s browser. Under the hood, a server action is just a POST request, and it can set cookies just like any other HTTP call.
frontend/apps/web/src/actions/auth.ts
export const loginAction = async (  _prevState: ApiResult,  formData: FormData): Promise<ApiResult> => {  const body = Object.fromEntries(formData) as BodyLoginLoginAccessToken;  const apiResponse = await LoginService.loginAccessToken({ body });
  const { response, ...result } = apiResponse;  await forwardCookiesFromResponse(response);
  return result;};
React Hook Form and useActionState
Now that we have configured the backend and HTTP client, it is time to handle form submission within our client code. For some time, react-hook-form has been the dominant forms package in the React ecosystem. There are a few tricks to integrate it properly with the useActionState React API and server actions.
Here is example code for creating an item:
frontend/apps/web/src/components/dashboard/items/form-item-create.tsx
const defaultValues: ItemCreateFormValues = {  title: '',  description: '',} as const;
const resolver = zodResolver(itemCreateSchema);
const FormItemCreate: FC<Props> = ({ onSuccess, onCancel }) => {  const initialState = { data: undefined };  const [state, formAction, isPending] = useActionState(itemCreateAction, initialState);
  const form = useForm<ItemCreateFormValues>({ resolver, defaultValues });
  const isSuccess = isSuccessApiResult(state);
  useEffect(() => {    if (isSuccess) onSuccess?.();  }, [isSuccess, onSuccess]);
  const isError = isErrorApiResult(state);
  const validateAndSubmit = (event: FormEvent<HTMLFormElement>) => {    event.preventDefault();
    form.handleSubmit(() => {      const formElement = event.target as HTMLFormElement;      const formData = new FormData(formElement);
      startTransition(() => {        formAction(formData);        form.reset();      });    })(event);  };
  return (    <Form {...form}>      <form action={formAction} onSubmit={validateAndSubmit} className="space-y-6">        <FormField          control={form.control}          name="title"          render={({ field }) => (            <FormItem>              <FormLabel>Title *</FormLabel>              <FormControl>                <Input {...field} placeholder="Enter item title..." disabled={isPending} />              </FormControl>              <FormMessage />            </FormItem>          )}        />
        <FormField          control={form.control}          name="description"          render={({ field }) => (            <FormItem>              <FormLabel>Description</FormLabel>              <FormControl>                <Input {...field} placeholder="Enter item description..." disabled={isPending} />              </FormControl>              <FormMessage />            </FormItem>          )}        />
        {isError && (          <Alert variant="destructive">            <AlertDescription>{getApiErrorMessage(state.error)}</AlertDescription>          </Alert>        )}
        <div className="flex justify-end space-x-2">          <Button type="button" variant="outline" onClick={onCancel} disabled={isPending}>            Cancel          </Button>
          <Button type="submit" disabled={isPending}>            {isPending ? (              <>                <Loader2 className="mr-2 h-4 w-4 animate-spin" />                Creating...              </>            ) : (              'Create Item'            )}          </Button>        </div>      </form>    </Form>  );};
Form submission and validation
The code above addresses two important requirements:
-
Server actions are designed to support form submission even with JavaScript disabled. In our code, we support this by assigning the
actionattribute on the<form />tag to theformActionresult returned by theuseFormActionhook:<form action={formAction} ... />. -
We use client-side JavaScript to validate the fields with Zod and display user-friendly error messages. For this, as well as for form submission when JavaScript is enabled, we use the
validateAndSubmitevent handler attached to theonSubmitevent:<form onSubmit={validateAndSubmit} ... />.
I learned this trick from the tutorial linked in this GitHub discussion comment: react-hook-form/discussions/11832#discussioncomment-11832211.
useActionState
React provides the useActionState hook not only to handle form submission and call server actions, but also to manage state, all at the same time. It accepts the server action itemCreateAction as an argument and returns the formAction function, which can be used to bind to the form’s action attribute, invoked manually with an event handler, or both at the same time, as we do in this case.
const [state, formAction, isPending] = useActionState(itemCreateAction, initialState);State management is modeled in a way that is somewhat reminiscent of reducers in Redux. It uses the concept of previous and next state, where the next state is the result of applying a transformation to the previous state, in this case, the transformation occurs on the server. Naturally, it all starts with an initial state.
In our example, useActionState accepts initialState as the second argument, and the server action response is contained within the state item in the returned tuple.
Server actions handle success and error results
There are certain rules that apply to React server actions in general:
-
In server actions, you shouldn’t throw exceptions but instead return errors within the result. This affects which particular generic we will use to type the OpenAPI client response, because in our case a server action is just a proxy to the respective FastAPI endpoint.
Here is the
ItemsService.createItem()return type as an example. This type is reused for both FastAPI and the server action. This is intentional because the server action is just a proxy, and we want to avoid any unnecessary transformation of the results.As mentioned earlier, errors should be included as return values. This type clearly shows that: the result is a union of success and error branches and additionally contains the raw HTTP
Responseobject. You may recall that we already used it to extract the cookie in the login endpoint.Promise<({data: ItemPublic;error: undefined;} | {data: undefined;error: HttpValidationError;}) & {response: Response;}> -
Server actions have limited serialization capabilities. You cannot return class instances, error instances, database model instances, etc. You should mostly rely on object literals for return values from server actions.
Let’s see the code example:
frontend/apps/web/src/actions/item.ts
frontend/apps/web/src/actions/item.ts export const itemCreateAction = async (_prevState: ApiResult,formData: FormData): Promise<ApiResult> => {const body = Object.fromEntries(formData) as ItemCreate;const apiResponse = await ItemsService.createItem({ body });const { response: _, ...result } = apiResponse;revalidatePath(ITEMS);return result;};Note that the
responsefield is a class instance and is not serializable, which is why we omit it from the server action return value.You may recall that we bound the
actionattribute toformActionin the form:<form action={formAction} ... >. Because of this, form values are received asFormDatain the server action, and we useObject.fromEntries()to convert it to a plain object that can be forwarded as the HTTP request body to the FastAPI endpoint.
useActionState vs useTransition to call actions
Just a quick reminder: useActionState is not the only way to call a server action. It is typically used with a form element, while also providing state and an isPending flag. We have already seen a code example for this.
When we have a simple void server action, we can skip the form and simply invoke the action within an event handler. Such calls are typically marked as lower priority by wrapping them with startTransition. Below is a code example:
frontend/apps/web/src/components/dashboard/items/dropdown-item.tsx
const DropdownItem: FC<Props> = ({ item }) => {  const [isPending, startTransition] = useTransition();
  const handleDeleteItem = (userId: string) => {    startTransition(() => {      itemDeleteAction(userId);    });  };
  // ...
};
Completed code
The relevant files:
git clone git@github.com:nemanjam/full-stack-fastapi-template-nextjs.gitgit checkout be2b94b72b343563d21aeac29743099af8512f62
# Backendbackend/app/core/security.pybackend/app/api/deps.pybackend/app/api/routes/login.pybackend/app/api/routes/users.py
# Frontend
# OpenAPI configurationfrontend/apps/web/openapi-ts.config.tsfrontend/apps/web/src/lib/hey-api.ts
# Queries - Next.js serverfrontend/apps/web/src/app/dashboard/items/[[...page]]/page.tsxfrontend/apps/web/src/components/dashboard/home/list-recent-items.tsx
# Queries - Next.js clientfrontend/apps/web/src/app/page.tsx
# Next.js API proxy endpointfrontend/apps/web/src/app/api/client-proxy/[...path]/route.ts
# Mutations
# Server actionsfrontend/apps/web/src/utils/actions.tsfrontend/apps/web/src/actions/item.tsfrontend/apps/web/src/actions/auth.ts
# Formsfrontend/apps/web/src/components/dashboard/items/form-item-create.tsxfrontend/apps/web/src/components/dashboard/items/dropdown-item.tsx
Conclusion
Congratulations on reading this far. It was long to read, but also long to write and figure out.
Next.js is a comprehensive full-stack meta-framework, but there are situations where you might want to use it with a backend written in a completely different programming language. In this tutorial, we have demonstrated that it is entirely possible to bridge the modern Next.js ecosystem with a powerful Python-based FastAPI backend while preserving the full benefits of React Server Components and Server Actions. This approach shows that you don’t have to compromise on developer experience or type safety when using a non-TypeScript backend.
The key idea is that Next.js remains the only thing the browser ever talks to. FastAPI is treated as an internal service behind the Next.js server. This keeps a clean React mental model: components call server actions, server actions call strongly typed OpenAPI clients, and only the Next.js server handles cookies, authentication, and cross-service communication. From the client’s perspective, nothing changes.
The result is a stack where FastAPI does what it does best (Python, validation, data, ML, background jobs) and Next.js does what it does best (React, rendering, routing, and UX), without either one leaking into the other.
Feel free to explore the complete implementation in the accompanying repository. It serves as a solid starting point for anyone building AI-powered or data-intensive applications that require the rich AI/ML ecosystem and library availability of Python on the backend, along with the developer experience of modern React on the front.
Have you faced similar challenges and used a different approach? Feel free to share in the comments. I would love to hear about your experience.
References
- Server Actions, Next.js docs https://nextjs.org/docs/app/getting-started/updating-data
- HttpOnly cookie PR https://github.com/fastapi/full-stack-fastapi-template/pull/1606
- HttpOnly cookie branch https://github.com/sinkozs/full-stack-fastapi-template/tree/use-http-only-cookie
@hey-api/openapi-tsconfiguration docs https://heyapi.dev/openapi-ts/configuration@hey-api/client-nextclient docs https://heyapi.dev/openapi-ts/clients/next-js- Connect React Hook Form with server action trick, blog article https://github.com/orgs/react-hook-form/discussions/11832#discussioncomment-11832211, https://dev.to/emmanuel_xs/how-to-use-react-hook-form-with-useactionstate-hook-in-nextjs15-1hja
More posts
-
Comparing BFS, DFS, Dijkstra, and A* algorithms on a practical maze solver example
Understanding the strengths and trade-offs of core pathfinding algorithms through a practical maze example. Demo app included.
-
Runtime environment variables in Next.js - build reusable Docker images
Learn how to configure Next.js with runtime environment variables and build Docker images you can reuse across multiple environments.
-
Build an image gallery with Astro and React
Learn through a practical example how to build a performant, responsive image gallery with Astro and React.