Automating the deployment of a static website to Vercel with Github Actions
Use Github Actions and the Vercel CLI to automate the deployment of a static website to Vercel.
· tutorials · 7 minutes
Introduction
This article focuses specifically on deploying static websites to Vercel. In a previous article https://nemanjamitic.com/blog/2026-02-22-vercel-deploy-fastapi-nextjs, we covered in detail how to deploy a full-stack application using the Vercel CLI from a local development environment. This time, we will use the same CLI inside a Github Actions runner to automate redeploying a static website on every push, for example, after adding a new blog article in markdown.
As an example, we will deploy the same blog website you are currently reading. The site itself is a statically built Astro application.
Vercel Github integration vs Github Actions
Vercel supports deployments through a Github integration (documented here: https://vercel.com/docs/git/vercel-for-github). You provide Vercel with your Github repository URL and read access, and Vercel automatically redeploys your application on every push. If you prefer not to grant Vercel access to your source code or Github repository, or if you want more control over the deployment process, you can instead use Github Actions, the approach described in this article.
Vercel configuration files
As with any Vercel deployment, you need to provide Vercel with additional information about the project’s build process, such as the framework, build command, and output directory, as well as which files should be included or ignored during deployment.
Before adding any configuration files, go to your Vercel dashboard, create a new project, give it a name, and set all required environment variables.
vercel.json
The contents of the vercel.json file are mostly self-explanatory. We specify the astro framework, and the build command and output directory match those used in the local development environment. With this configuration, Vercel knows exactly how to build the application.
https://github.com/nemanjam/nemanjam.github.io/blob/main/vercel.json
{ "framework": "astro", "buildCommand": "pnpm build", "outputDirectory": "dist", "cleanUrls": true, "trailingSlash": false}.vercelignore
For performance reasons, it is important to avoid uploading files that are not used during the build and deployment process, such as dependencies, .env* files, documentation, or Docker-related configuration. The .vercelignore file is used to exclude these unnecessary files. Additionally, on the free tier, your deployment must stay below the 250 MB size limit.
https://github.com/nemanjam/nemanjam.github.io/blob/main/.vercelignore
# Node / package managersnode_modules.pnpm-store.npm.yarn
# ! Needed for commit info# Vercel omits it by default, now way to upload it# .git# .gitignore
# Local env files.env.env.*!.env.*example
# Logsnpm-debug.log*yarn-debug.log*yarn-error.log*
# Docker & toolingdocker/scripts/
# Documentation & notesdocs/
# OS / editor junk.DS_Store.idea.vscode
# Astro build cache.astro/*# Keep types if build needs them!.astro/types.d.ts
# Github.github/
The exact contents of this file depend on your specific project. To ensure you have excluded all unnecessary paths, go to your Vercel dashboard and navigate to My Project -> My Deployment -> Source, where you can clearly see exactly which files are uploaded.
Github Actions workflow
Once again, go to your Vercel dashboard and create an access token in your account settings. Add this token as the VERCEL_TOKEN Github repository secret. Then, in your Vercel project settings, copy your user (organization) ID and project ID and add them as the VERCEL_ORG_ID and VERCEL_PROJECT_ID Github repository secrets.
With this setup, Github is aware of your Vercel project, and NOT the other way around. Vercel only receives the compiled application artifacts and has no access to your Github repository or source code.
https://github.com/nemanjam/nemanjam.github.io/blob/main/.github/workflows/vercel__deploy-manual.yml
name: Deploy to Vercel manually
# Docs example: https://vercel.com/kb/guide/how-can-i-use-github-actions-with-vercel
on:  push:    branches:      - 'main'    tags:      - 'v[0-9]+.[0-9]+.[0-9]+'
  pull_request:    branches:      - 'disabled-main'
  workflow_dispatch:
permissions:  contents: read
env:  # Project vars  # Redundant, vercel pull will define them  # SITE_URL: 'https://nemanjam.vercel.app'  # PLAUSIBLE_DOMAIN: 'nemanjamitic.com'  # PLAUSIBLE_SCRIPT_URL: 'https://plausible.arm1.nemanjamitic.com/js/script.js'
  # Vercel vars  VERCEL_ORG_ID: ${{ secrets.VERCEL_ORG_ID }} # user id  VERCEL_PROJECT_ID: ${{ secrets.VERCEL_PROJECT_ID }}
jobs:  deploy-vercel:    runs-on: ubuntu-latest
    steps:      - name: Checkout code        uses: actions/checkout@v4        with:          fetch-depth: 1
      - name: Print commit id and message        run: |          git show -s --format='%h %s'          echo "github.ref -> ${{ github.ref }}"
      - name: Set up Node.js        uses: actions/setup-node@v4        with:          node-version: 24.13.0          registry-url: 'https://registry.npmjs.org'
      - name: Install pnpm        uses: pnpm/action-setup@v4        with:          version: 10.30.1
      - name: Install Vercel CLI        run: pnpm add -g vercel
      - name: Pull Vercel production environment variables        run: vercel pull --yes --environment=production --token=${{ secrets.VERCEL_TOKEN }}
      - name: Build project using Vercel        run: vercel build --prod --token=${{ secrets.VERCEL_TOKEN }}
      - name: Deploy prebuilt project to Vercel        run: vercel deploy --prebuilt --prod --token=${{ secrets.VERCEL_TOKEN }}
Repository secrets
Vercel’s official tutorial already does a good job of explaining the basics and provides a solid starting workflow file: https://vercel.com/kb/guide/how-can-i-use-github-actions-with-vercel. In this article, we will focus on a specific use case: deploying a static website.
Let’s start by explaining the Github repository secrets used in this workflow:
VERCEL_TOKEN- an access token that the Github Actions runner uses to authenticate with Vercel and create a deploymentVERCEL_ORG_ID- a Github user or organization ID that identifies who owns the deploymentVERCEL_PROJECT_ID- identifies the Vercel project being deployed
The VERCEL_ORG_ID and VERCEL_PROJECT_ID values are passed as environment variables and are defined at the workflow level, making them available to all jobs. The VERCEL_TOKEN is passed to individual commands as a command-line argument.
Set up Node.js and Vercel CLI
The first part of the workflow is standard and straightforward. We simply check out the repository (fetch-depth: 1 to fetch only the latest commit for speed), then install Node.js, pnpm, and the Vercel CLI. These steps set up the prerequisites needed to build and deploy the project in the following steps.
Environment variables
Here we are referring to your project’s environment variables. Since we are deploying a fully static website, all environment variables are strictly build-time variables, as explained here: https://nemanjamitic.com/blog/2025-12-21-static-website-runtime-environment-variables. The Vercel target environment does not need to define any variables because they are inlined during the build, immutable, and ignored afterward. This also means the build artifacts are specific to the environment they were built for.
Although variables in the target environment are ignored at runtime, it is still a good practice to define them in the Vercel dashboard and use Vercel as the single source of truth for your deployment. This allows you to easily pull them into the Github Actions runner using: vercel pull --yes --environment=production --token=${{ secrets.VERCEL_TOKEN }}
The --environment=production flag selects the production environment. To deploy to preview environments, you can create a separate workflow .yml file triggered by feature branches (any branch other than main) and use vercel pull with the --environment=preview option to fetch the corresponding variables.
on: push: branches-ignore: - mainNote: You can define your project’s environment variables using the env: key at the workflow or job level, but this is generally not recommended. Doing so will lead to conflicts with variables pulled via vercel pull and issues with overriding priority, unless you are confident in managing them. Relying exclusively on variables from vercel pull ensures clarity and simplicity.
Building and deploying
At this point, we are ready to build the project using: vercel build --prod --token=${{ secrets.VERCEL_TOKEN }}. This command generates the application artifacts in the output folder specified in vercel.json, all within the Github Actions runner. After that, the Vercel CLI copies the framework’s output folder (defined in vercel.json) inside the .vercel/output folder, creating a deployment-ready package that can be uploaded directly to Vercel.
The final step is to upload the deployment-ready package inside the .vercel/output folder to Vercel using: vercel deploy --prebuilt --prod --token=${{ secrets.VERCEL_TOKEN }}. The --prebuilt option tells Vercel to skip the build step since the application has already been built in the Github Actions runner.
That’s it. Add the shown vercel.json, .vercelignore, and .github/workflows/vercel__deploy-manual.yml files to your repository, then run git push to trigger the workflow. Once it completes, you can view your website at <your-project-name>.vercel.app.
Completed code
- Repository: https://github.com/nemanjam/nemanjam.github.io
- Demo: https://nemanjam.vercel.app
The relevant files:
git clone git@github.com:nemanjam/nemanjam.github.io.git
# Files.github/workflows/vercel__deploy-manual.ymlvercel.json.vercelignore
.dockerignore.gitignore
# Vercel configuration and workflow in a clear diffhttps://github.com/nemanjam/nemanjam.github.io/commit/c0d6c6739b3215a6841a463115ec5242ea76e492
Conclusion
CI/CD workflows are the standard way to handle deployments, and deploying to Vercel is no exception. By combining Github Actions with the Vercel CLI, you can implement a fully automated deployment pipeline with just a few lines of configuration.
This approach gives you complete control over the build and deployment process while keeping your source code private and your security model explicit. Once in place, deployments become predictable, repeatable, and hands-off.
How do you automate deployments to Vercel in your projects? Let me know in the comments.
References
- Github Actions with Vercel, Vercel official tutorial https://vercel.com/kb/guide/how-can-i-use-github-actions-with-vercel
- Astro on Vercel, Vercel docs https://vercel.com/docs/frameworks/frontend/astro
- Github integration, Vercel docs https://vercel.com/docs/git/vercel-for-github
vercel deploy --prebuiltoption, Vercel docs https://vercel.com/docs/cli/deploy#prebuilt
More posts
-
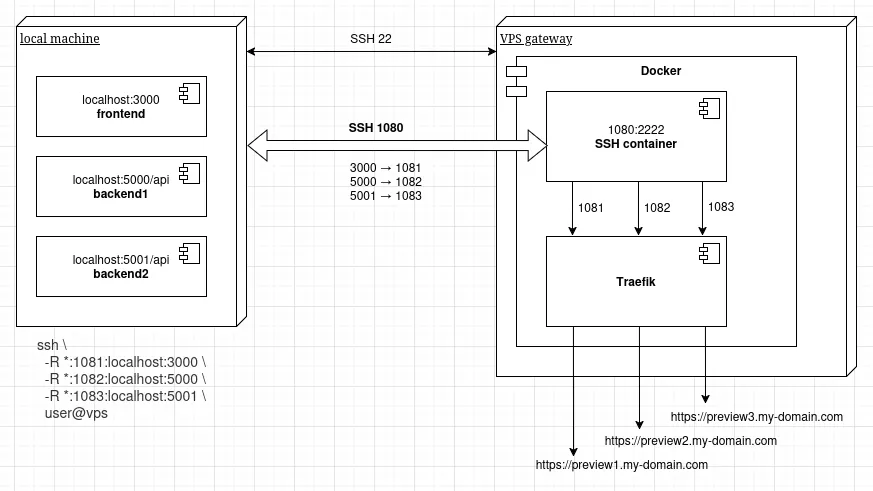
Expose local dev server with SSH tunnel and Docker
A practical example how to temporarily expose your local service to the internet.
-
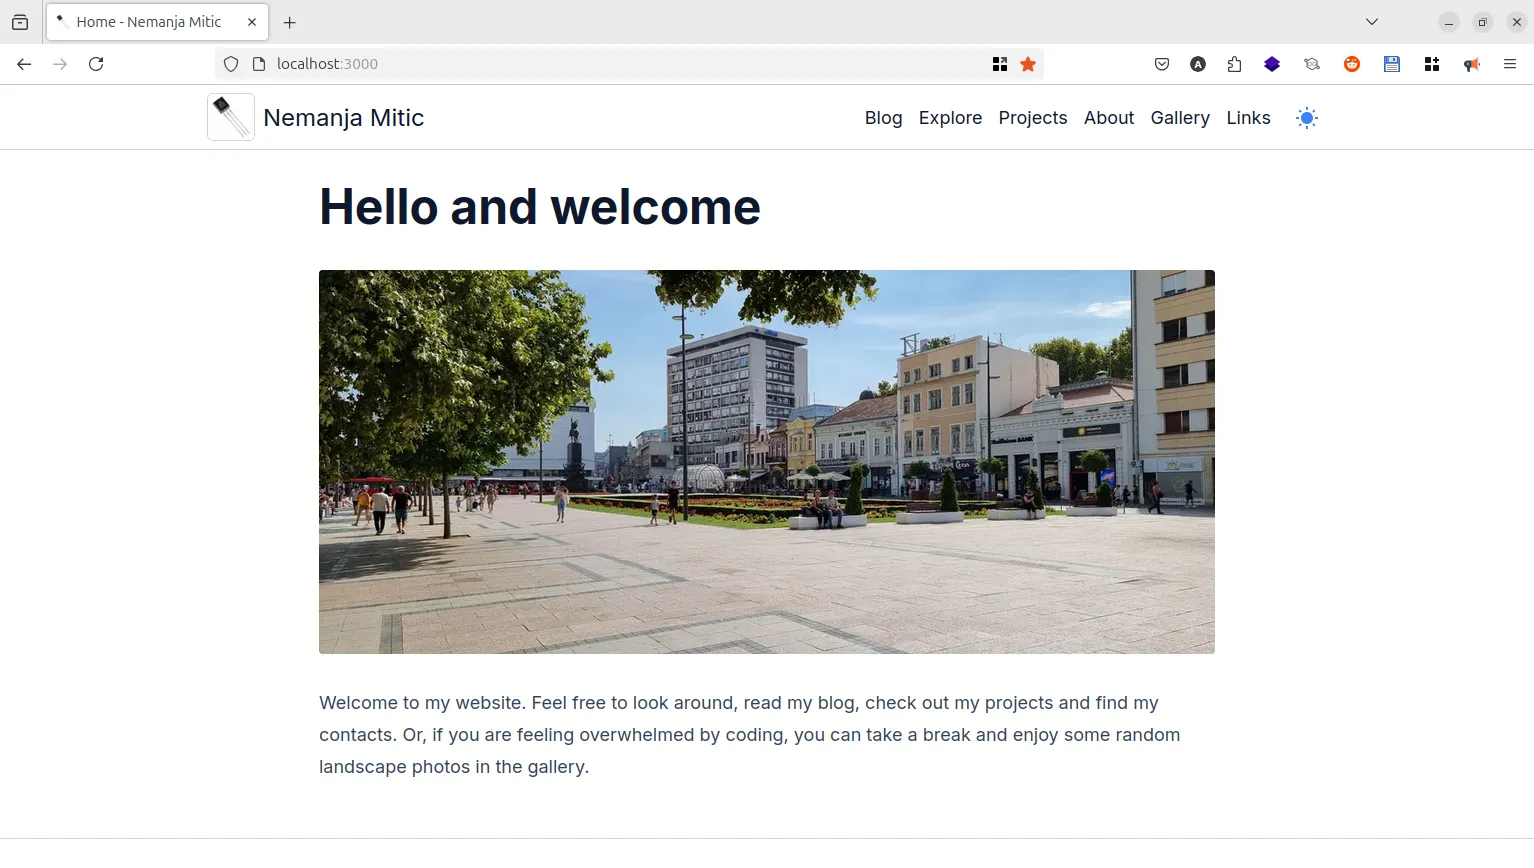
Build a random image component with Astro and React
Build a random image component to make your hero image more interactive and interesting.
-
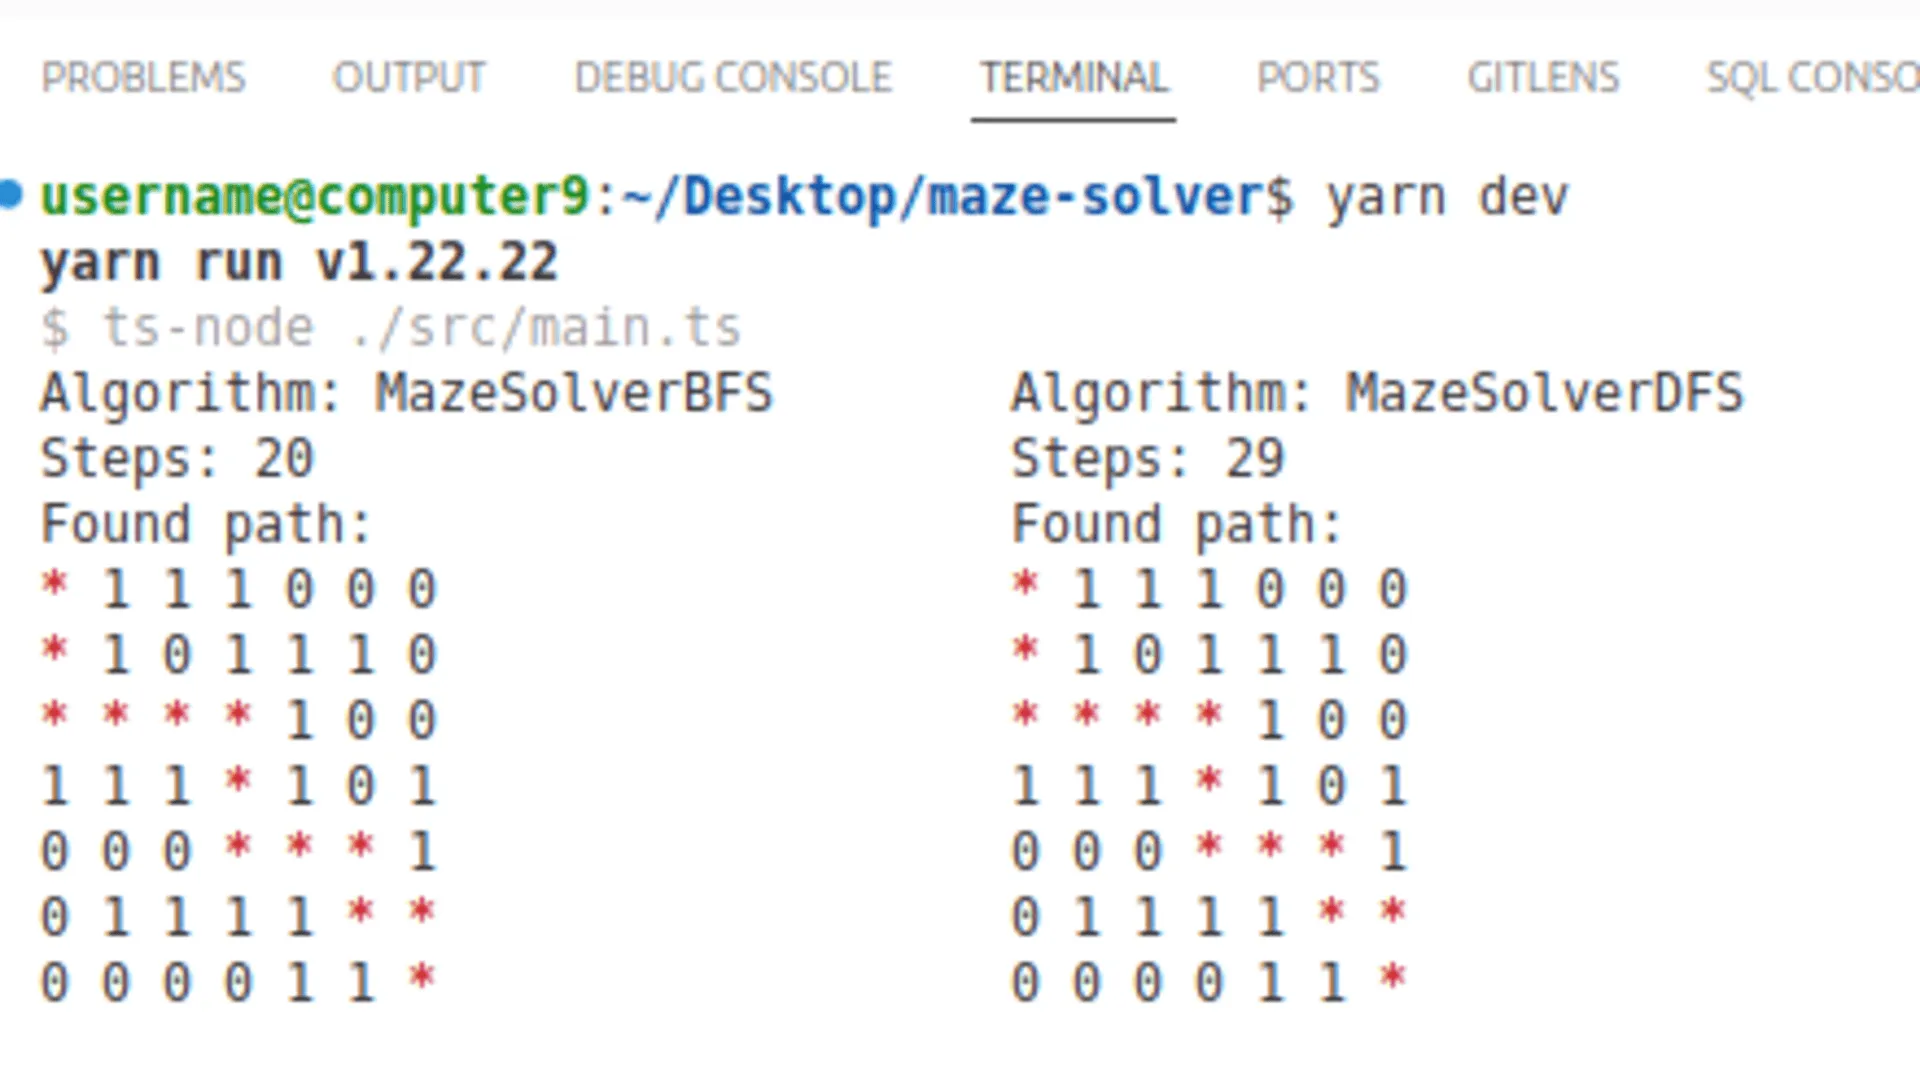
Comparing BFS, DFS, Dijkstra, and A* algorithms on a practical maze solver example
Understanding the strengths and trade-offs of core pathfinding algorithms through a practical maze example. Demo app included.